A beginner's guide to ESLint
Introduction
This guide introduces ESLInt, a JavaScript linting tool. The aim of this guide is to get you up and running with ESLint in your own projects.
The guide is aimed at the following audiences:
- JavaScript (ECMASCRIPT) developers new to ESLint
- Junior developers who want to write more consistent JavaScript
This guide assumes that you are familiar with the following programming tools/languages:
- basic JavaScript
- Node.js
- npm/ yarn
- using the command line
The code examples in this guide will use npm. If you are using yarn, make sure to run the corresponding commands.
At the end of this guide you will understand what ESLint is, why it is useful and how to integrate it in your own JavaScript projects and workflows. Additionally this guide will provide paths and links to further resources that will deepen your knowledge of ESLint and result in you writing more robust and bug free code.
What is ESLint?
ESlint is an open source linter that analyzes JavaScript code and identifies patterns in the code. This helps you find and fix potential bugs and results in more consistent and maintainable code.
ESLint is highly flexible, it allows you to define your own rules, extend rules made by others and disable rules for specific folders, files, and lines of code.
What can you do with ESLint?
Linters help you comply with common - or at least agreed upon- best practices. Using a tool like ESLint frees teams (and even individual contributors) from getting caught up in minor details of code style and catches probable bugs early, allowing developers to focus on real problems. The resulting code is more consistent and easier to maintain.
Below are some example ESLint use cases:
- warn if there are unused variables and imports in your code
- warn when
letis used for unchanging variables - enforce a maximum number of parameters in function definitions
- warn if a promise is dangling (this causes many bugs)
- checking for exposed secrets/credentials
- catch problematic code patterns, for example using loose equality operators (
==and!=) instead of strict equality operators (===and!==) - prevent type conversion
- warn of unreachable code, for example code that comes after
returnorbreak
A good linter like ESLint will free you from focusing on trivial details, force you to adopt programming best practices, and help you catch bugs while at the same time retaining the flexibility to choose when to violate those rules.
Installation
Navigate to the root of your project and, if you have not already done so, initialize it with npm or yarn:
npm initThis will generate a package.json file. Now run:
npm init @eslint/configThis will walk you through configuring your ESLint settings. You will be asked about the environment, whether you are using React, if you intend to use ESLint for code formatting, and other options.
The command will also create a .eslintrc configuration file in the format you specify, that is, either js, yml, or json. The rest of this guide uses a json format, but the settings are similar.
Configuring ESLint
After installing ESLint you will have an .eslintrc configuration file with your settings. It will look as below, with slight variations depending on the options you chose during setup:
// .eslintrc.json
{
    "env": {
        "browser": true,
        "es2021": true,
    },
    "extends": "eslint:recommended",
    "overrides": [
    ],
    "parserOptions": {
        "ecmaVersion": "latest"
    },
    "rules": {
    }
}
Specifying your environment and variables
ESLint does not assume an environment. As a result you may find that certain globals are not available in one environment. This will lead to warnings such as 'process' is not defined if your environment is browser, or 'window' is not defined if in a node environment.
You can specify your preferred environments in the .eslintrc configuration file on the env key. For example:
// .eslintrc.json

{
    "env": {
        "browser": true,
        "es2021": true,
        "node": true
    }
}
Rules
By default ESLint enables some rules for you. Opening the .eslintrc configuration file will show the following line:
// .eslintrc.json
{
 "extends": "eslint:recommended"
}
This turns on all the rules recommended by the ESLint team, including:
no-undef- Disallows the use of undeclared variablesno-unreachable- Disallows code afterreturn,throw,continue, andbreakno-unused-vars- Disallows declaring variables that are never used in the program
The above list is non-exhaustive. A full list of recommended and suggested rules is found here.
However, you may want to define your own, or remove the recommended rules altogether.
If you want to remove the recommended rules, you can delete the "extends": "eslint:recommended" key from the eslint configuration file.
To add new rules you need to edit the "rules" key in the configuration file. For example, suppose you decide to follow what is considered good practice and use type-safe equality operators === and !== instead of == and != you would add the rule to the configuration file as follows:
// .eslintrc.js

{
    "rules": {
        "eqeqeq": ["error", "always"]
    }
}
The code below shows two snippets, one that violates this rule and another which is correct:
// main.js


// incorrect code for strict equality rule, will raise an error
if ( typeof firstName == "string") {
    let fullName = firstName + " " + lastName
}

// correct code for strict equality rule
if (typeof firstName === "string") {
    let fullName = firstName + " " + lastName;
}
Linting your code
To run ESLint on your code, run:
npx eslint main.jsThis will display any detected errors and warnings in your terminal. A typical ESLint error log is shown below:
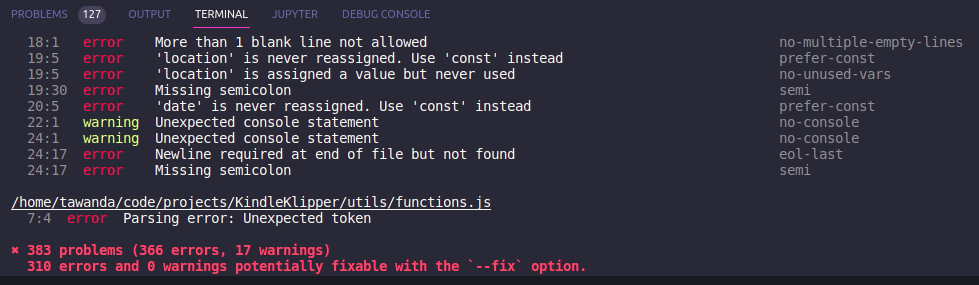
As you can see the log is very informative. It shows you were the error was generated, what rule was violated and also what can be fixed automatically.
Applying automatic fixes
You can apply automatic fixes on your code by running:
npx eslint --fix main.jsWhat can and cannot be fixed depends on the rules themselves.
Disabling rules
Sometimes it is necessary to disable the linting rules for a folder, a file, a line or a block of code. In certain situations code may need to be written that violates your rules. Perhaps you might have a code block that makes more sense to other developers in a format or style that violate your ESLint rules, for example:
const matrix = [
 0, 1, 1,
 1, 0, 1,
 0, 0, 1
]
ESLint gives you the flexibility to do this for folders, files, code blocks and individual lines of code as detailed below. Additionally ESLint gives you fine control over these rules, for example by only restricting certain rules.
Disabling rules for an entire folder
In your project’s root folder you can create an .eslintignore file, for example, using the command line:
touch .eslintignoreAny folder or file listed in this file will be excluded from linting similar to files or folders specified in a .gitignore file. For example the following configuration would ignore the output folder and the test.js file:
#.eslintignore

test.js
output
By default ESLint will not lint your .node_modules directory.
Disabling Warnings for an entire file
You can also disable linting using comments within your code. To disable linting for an entire file include the following comment at the top of the file (Warning: the inline comment (//) will not work):
/* eslint-disable */

// this file will not be linted
Disabling a single line
You can disable a single line in two ways:
- disabling the next line - this disables linting for the next line of code:
// eslint-disable-next-line
const inputFile = process.argv[2]- disabling the current line:
let firstName = "Jon" // eslint-disable-line
The above rules will disable all the rules for that line. ESLint can be further customized to disable a specific or multiple rules on that line.
Disabling a code block
ESLint will disable linting for any code block which is between /* eslint-disable */ and /* eslint-enable */:
/* eslint-disable */

// warnings for the following code will be suppressed
const matrix = [
 0, 1, 1,
 1, 0, 1,
 0, 0, 1
]

/* eslint-enable */
It is also possible to specify within the block comment rules that are to be disabled or enabled.
Disabling Inline Comments
You can also disable all inline configuration comments such as eslint-disable-next-line with the noInLineConfig setting in the .eslintrc file:
// .eslintrc.json
{
 "rules": {},
 "noInLineConfig": true,
}
More on disabling rules is covered in the docs.
Extending Rules
You can also extend pre-written configurations from others. There are many configurations following different programming styles. Popular ones include airbnb and google. To use a configuration you install it via npm and then extend it:
npm install airbnb-base
In the .eslintrc configuration file you add it to the extends key:
// .eslintrc.json
{
 "extends": "airbnb-base"
}
This will import and use the configuration for the Airbnb style guide.
Conclusion
This guide provided a broad overview of ESLint, showing you how it is installed and used, and giving introductions to common configurations.
However ESLint is capable of much more. Please check out the docs for more information on ESLint usage and configurations. In particular you may be interested in: